Dear readers, please note that this is the old website of maxEmbedded. The articles are now no longer supported, updated and maintained. Please visit the new website here and search for this post. Alternatively, you can remove .wordpress from the address bar to reach the new location.
Example: If the website address is http://maxEmbedded.wordpress.com/contact/, then removing .wordpress from it will become http://maxEmbedded.com/contact/.
We apologize for the inconvenience. We just want to give you a better viewing and learning experience! Thanks!
In this post, we will learn something cool! Something visual! Something like displaying your name in an LCD and then making it roll over, bounce over, etc etc etc 😉
So basically I am re-posting this tutorial, but in a different manner. I hope it will be useful for you.
LCD – General Introduction
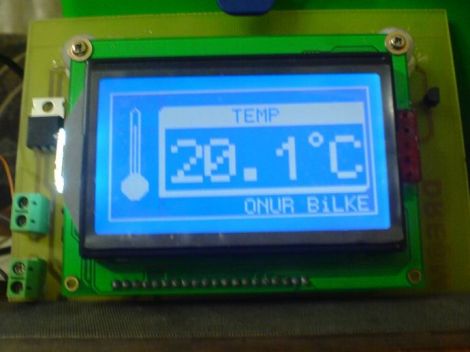
LCD stands for Liquid Crystal Display. It can be used to display anything (virtually anything!). They are of many types. The ones we commonly use for embedded systems, robotics, etc are of two types – character LCD and graphical LCD. We will discuss about character LCDs in this post whereas graphical LCDs will be discussed later.
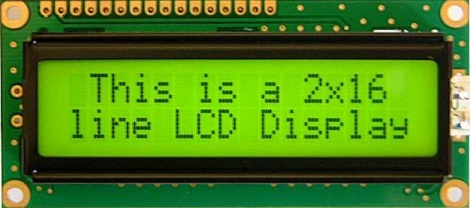
The most popular type of character LCD is the HD44780 Character LCD. In this post, we will be using the JHD 162A character LCD shown below. One of my readers, Rizwan, has also worked out this tutorial successfully using the LMB162ABC character LCD. Thanks Rizwan for the update! 🙂
The JHD 162A LCD is fully compatible with the HD44780 LCD. Hence, the same set of codes will work for both. It is a 16×2 LCD module i.e. it has 16 columns and 2 rows for display. It can operate in either 8 bit mode or 4 bit mode. In 8 bit mode, an 8 bit is data is sent to the LCD from the MCU whereas in 4 bit mode, 4 bits of data are sufficient to operate it.
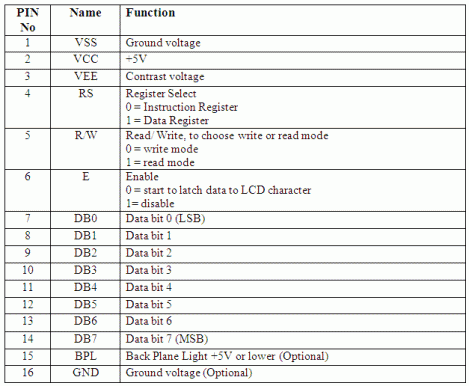
It has 16 pins, the details of which is given below:
Now, for the LCD to work in 8 bit mode, it requires the 8 data pins (DB0…DB7) and 3 control pins (RS, R/W, EN) whereas in 4 bit mode, it requires 4 data pins (DB4…DB7, only the upper nibble) and 3 control pins (RS, R/W, EN). Though the 8 bit mode is faster and more accurate, it consumes more pins of the MCU. However, the 4 bit mode is also fast and accurate enough to satisfy most of our need, plus it requires only 7 pins for interfacing. Hence, we will be working in the 4 bit mode. In the 4 bit mode, data pins DB0…DB3 are left open.
Interfacing LCD
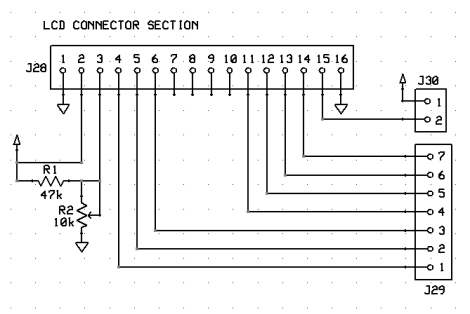
First of all, you need to make basic connections of the LCD. You can refer to the following circuit diagram for this. Relate it with the pin configuration given above.
Before coding, kindly download the LCD library written by Peter Fleury from here and the link doesn’t work, then download it from here. This is an awesome library with predefined codes so that we can ease out a little bit by not breaking our heads upon the coding part. Thus we get to use the library functions instead of going into the depths of programming. This method is much more productive, efficient and time saving.
Configuring the library
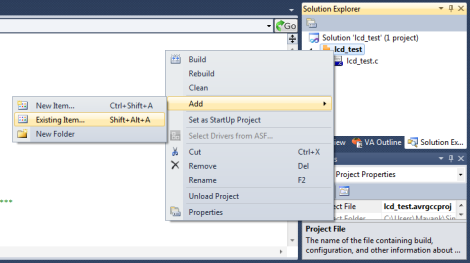
Now that we are ready for programming, open up AVR Studio 5 and create new project. If you are new to AVR Studio 5, view this page to get started. Now in the right pane, you will find the Solution Explorer window. There, right click on the project name, go to Add and then choose Existing Item…. Now browse to the folder where you have downloaded the libraries and choose lcd.c and lcd.h.
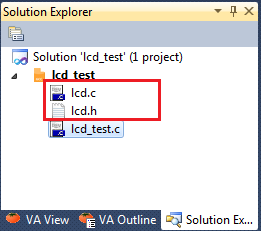
Now you can find the two files (the c file and the header file) listed in your project. Now follow the following steps in order to configure the library.
- Double click on the ‘lcd.h’ file (in the Solution Explorer) to open it. Now make sure that you scroll down very slowly or else you will miss out on some important details.
- As you begin to scroll down, you will find some commented text describing the library. Note the line where it says LCD_IO_MODE = 0 for memory mapped mode, LCD_IO_MODE = 1 for 4 bit mode, whereas 8 bit mode is not supported.
- Scroll further down and you will find a line asking you to set your XTAL (or F_CPU). By default it’s 8MHz. Replace it with your own exact F_CPU. Make sure that this is correct or else there will be mismatch in delay timings.
- Scroll down to the place where you need to set your LCD_IO_MODE. Make sure that it is set/defined to 1 (for 4 bit mode).
- Just below it lies the best part. You can choose your own port where to interface the LCD with! As I said earlier, in 4 bit operation, there will be 4 data pins (DB4…DB7) and 3 control pins (RS, R/W, EN). You can either choose them to be across one port, or distributed across different ports. This is where you do it. By default it’s across PORTA. Choose them as per your pin availability.
- Now, if you further scroll it down, you can find a list of different commands that can be passed to the LCD using the lcd_command() function.
- Now, if you continue to scroll, you will find a list of all the functions defined in the library along with their description. You will find functions like lcd_init(), lcd_clrscr(), lcd_home(), lcd_gotoxy(), lcd_putc(), lcd_puts(), lcd_puts_p(), lcd_command(), lcd_data() and lcd_puts_P(). Their description is attached alongwith their declaration.
Coding
Now that you have gone through the different functions available, let’s write a sample code for it. Don’t forget to include “lcd.h” header file.
#include <avr/io.h>
#include <util/delay.h>

#include "lcd.h"

int main(void)
{
    lcd_init(LCD_DISP_ON_CURSOR); /* initialize lcd, display on, cursor on */
                                  /* for more options for
                                  /* lcd_init(), view lcd.h file
    while(1)                      /* run continuously */
    {
        lcd_clrscr();             /* clear screen of lcd */
        lcd_home();               /* bring cursor to 0,0 */
        lcd_puts("hello");        /* type something random */
        lcd_gotoxy(0,1);          /* go to 2nd row 1st col */
        lcd_puts("maxEmbedded");  /* type something random */
        _delay_ms(50);            /* wait 50ms */
    }
}
After building the project and burning your code, you will see “hello” written in the first row and “maxEmbedded” written in the second row. This was a basic example. Now it’s up to you upon how to exploit the library resources. Okay, try this one out by yourself. The LCD should display your in the first line, and then create a bouncing effect. Your name should move towards right till it reaches the corner. And then it should move left till it once again reaches the other corner. This should continue. Hint: Use lcd_command() function e.g. lcd_command(LCD_MOVE_DISP_RIGHT), lcd_command(LCD_MOVE_DISP_LEFT), etc.
Now try to create a rolling effect. The text should roll into the view and then move out of it. I found one such code here.
#include <avr/io.h>
#include <util/delay.h>
#include "lcd.h"

#define STRING_LENGTH 27
#define LCD_MAX 15

void main()
{
    char array[STRING_LENGTH] = { "welcome to maxEmbedded blog" };
    int i,j;
    int start;
    int end;

    lcd_init(LCD_DISP_ON_CURSOR);
    lcd_clrscr();
    while(1)
    {
        for ( j = 0; j < STRING_LENGTH; j++ )
        {
            if ( j >= LCD_MAX )
                lcd_gotoxy( 0, 0 );
            else
                lcd_gotoxy( LCD_MAX - j, 0 );

            start = (j <= LCD_MAX) ? 0 : (j - LCD_MAX);

            end = (j <= LCD_MAX) ? j : (start + LCD_MAX);

            if ( end >= STRING_LENGTH )
                end = STRING_LENGTH - 1;

            for ( i = start; i <= end; i++ )
                lcd_putc( array[i] );

            _delay_ms(100);
        }

        lcd_clrscr();
    }
}
How does it look? Cool, eh?
Displaying ‘int’ and ‘float’ values
One drawback of Fleury’s library is that the is no function which can directly display an integer or floating point value on the LCD. For that, we can use lcd_puts() itself in combination with itoa() and sprintf() funtions.
For displaying integer values, the following modification is required.
char buffer[10];

int n = 12345;

itoa(n, buffer, 10);
lcd_puts(buffer);
For displaying floating point values, the following modification is required.
char buffer[10];

float f = 3.1415926;

sprintf(buffer, "%f", f);
lcd_puts(buffer);
Thus, we are done with LCD interfacing. Now you can play with it. 😉
Possible Errors that might come up
While connecting the LCD, you might face some problems. Some of the most common problems that you might face are:
- Nothing is visible on the screen.
- Black Squares are visible on the screen.
- Only the cursor blinks on the screen.
- Sometimes even the screen blinks.
- Random/Garbage symbols are displayed on the screen.
For such troubles, you can follow the following troubleshooting methods (most of the time it works out!).
- Adjust the contrast pot to increase visibility.
- Check your connections. Check for any short circuit.
- Check and change the delay. Make sure you have entered the correct XTAL value in “lcd.h” file.
- And last but not the least, check your code! 😉


Your Tutorials are really excellent and I wish you can do a Tutorial based on Graphic LCD both (128×64 and 240×128) interfaced with the ATMEGA328P.
If yes you have done that type of a tutorial you can gave me link
Thank you for all your help in Embedded Programming
Hey Jack,
Thanks for the suggestion. We have added it on to our list, but it might be a while before you actually see it here. Currently focus is on embedded Linux. Thanks.
K no problem program and I will for that Graphic 128×64 lcd display tutorial.
Can you also do more tutorials on touch lcd display and TFT color display.
From JM Mehlape
Sent via my BlackBerry from Vodacom – let your email find you!
char buffer[10];
int n = 12345;
itoa(n, buffer, 10);
lcd_puts(buffer);
I have one problem :
if I have n=100
n-1
LCD puts 990
what I can do with a buffer to get 99 in LCD.
Your question doesn’t make sense to me. Could you please explain your question a little bit instead of giving a pseudo code of your question?
I found my problem.
I forgot to write lcd_clrscr();
thank you for great tutorial.